AAPANEL

- Linux
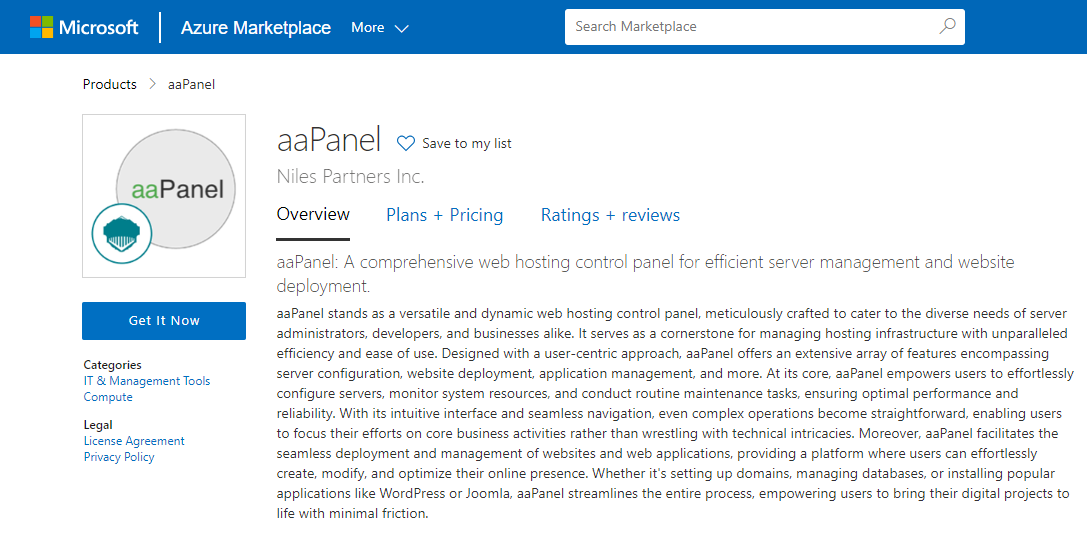
About

aaPanel stands as a versatile and dynamic web hosting control panel, meticulously crafted to cater to the diverse needs of server administrators, developers, and businesses alike. It serves as a cornerstone for managing hosting infrastructure with unparalleled efficiency and ease of use. Designed with a user-centric approach, aaPanel offers an extensive array of features encompassing server configuration, website deployment, application management, and more.
At its core, aaPanel empowers users to effortlessly configure servers, monitor system resources, and conduct routine maintenance tasks, ensuring optimal performance and reliability. With its intuitive interface and seamless navigation, even complex operations become straightforward, enabling users to focus their efforts on core business activities rather than wrestling with technical intricacies.
Moreover, aaPanel facilitates the seamless deployment and management of websites and web applications, providing a platform where users can effortlessly create, modify, and optimize their online presence. Whether it’s setting up domains, managing databases, or installing popular applications like WordPress or Joomla, aaPanel streamlines the entire process, empowering users to bring their digital projects to life with minimal friction.
- Type virtual machines in the search.
- Under Services, select Virtual machines.
- In the Virtual machines page, select Add. The Create a virtual machine page opens.
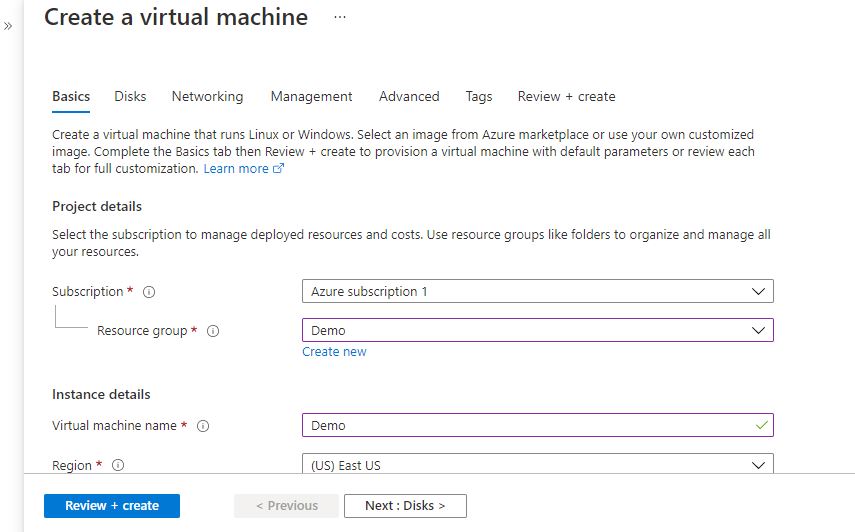
- In the Basics tab, under Project details, make sure the correct subscription is selected and then choose to Create new resource group. Type myResourceGroup for the name.*.
- Under Instance details, type myVM for the Virtual machine name, choose East US for your Region, and choose Ubuntu 18.04 LTS for your Image. Leave the other defaults.
- Under Administrator account, select SSH public key, type your user name, then paste in your public key. Remove any leading or trailing white space in your public key.
- Under Inbound port rules > Public inbound ports, choose Allow selected ports and then select SSH (22) and HTTP (80) from the drop-down.
- Leave the remaining defaults and then select the Review + create button at the bottom of the page.
- On the Create a virtual machine page, you can see the details about the VM you are about to create. When you are ready, select Create.
It will take a few minutes for your VM to be deployed. When the deployment is finished, move on to the next section.
Connect to virtual machine
Create an SSH connection with the VM.
- Select the Connect button on the overview page for your VM.
- In the Connect to virtual machine page, keep the default options to connect by IP address over port 22. In Login using VM local account a connection command is shown. Select the button to copy the command. The following example shows what the SSH connection command looks like:
bashCopy
ssh azureuser@10.111.12.123
- Using the same bash shell you used to create your SSH key pair (you can reopen the Cloud Shell by selecting >_ again or going to https://shell.azure.com/bash), paste the SSH connection command into the shell to create an SSH session.
Usage/Deployment Instructions
Step 1: Access the aaPanel in Azure Marketplace and click on Get it now button.
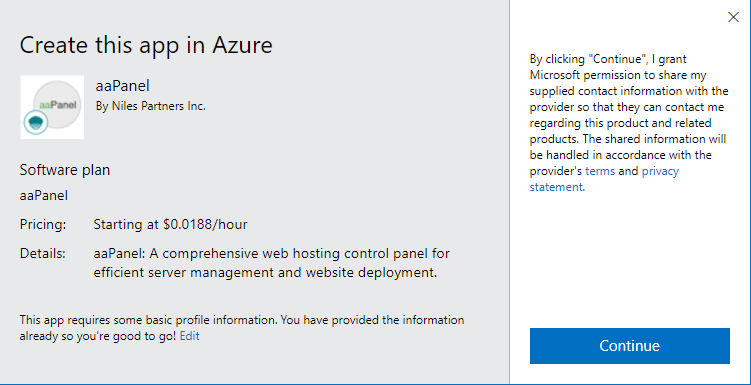 Click on Continue and then click on Create.
Step 2: Now to create a virtual machine, enter or select appropriate values for zone, machine type, resource group and so on as per your choice.
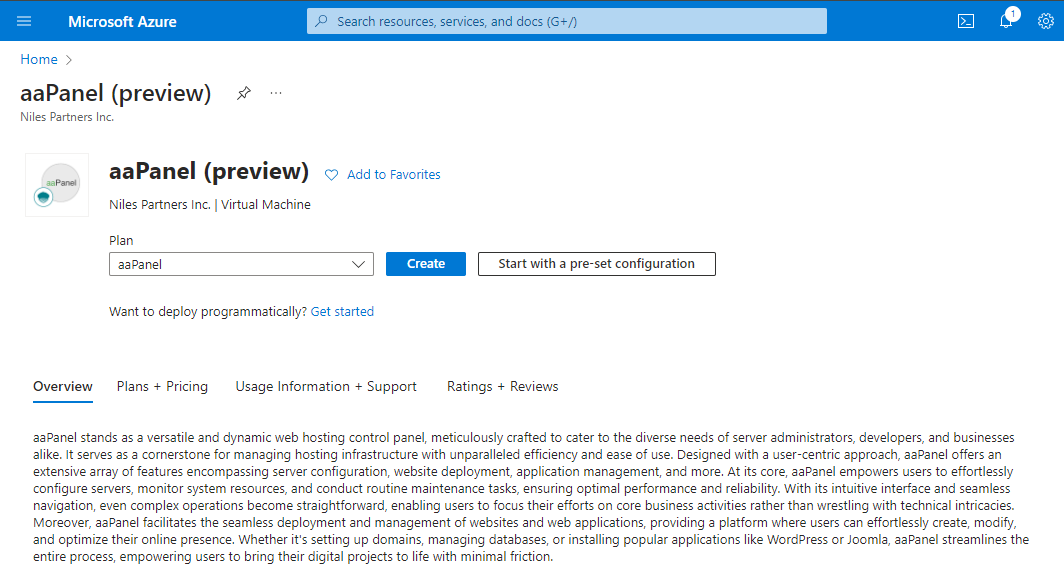


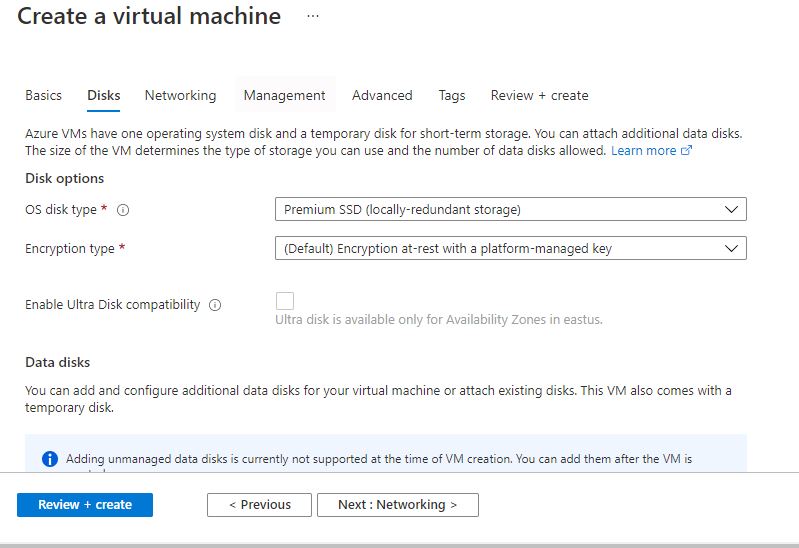

Click on Review + create.
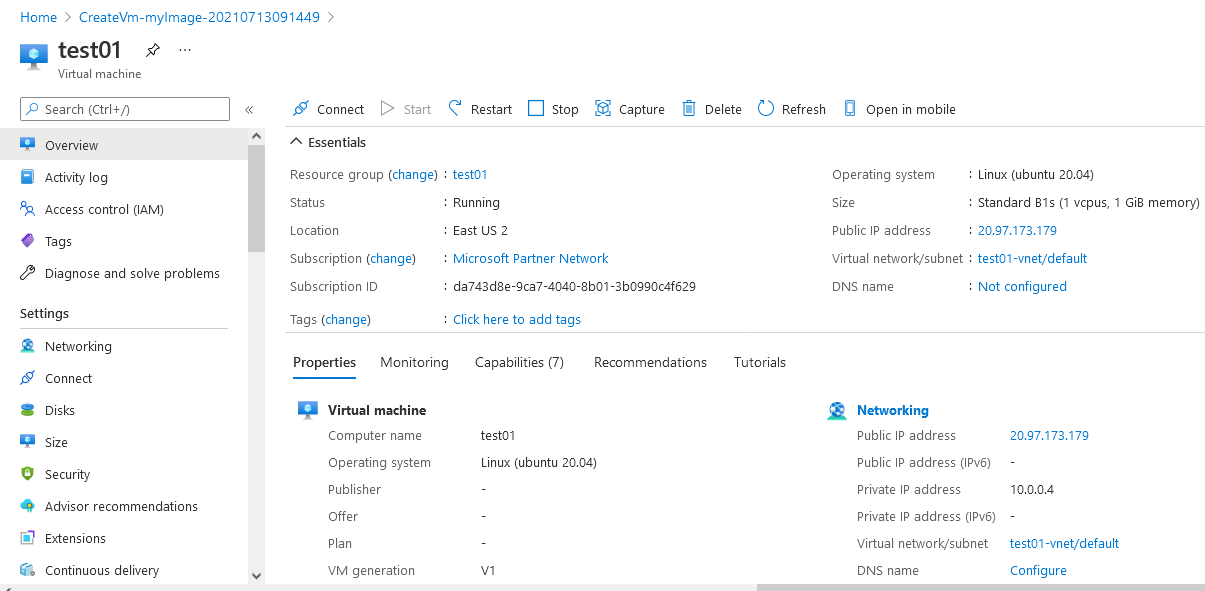
Step 3: The below window confirms that VM was deployed.
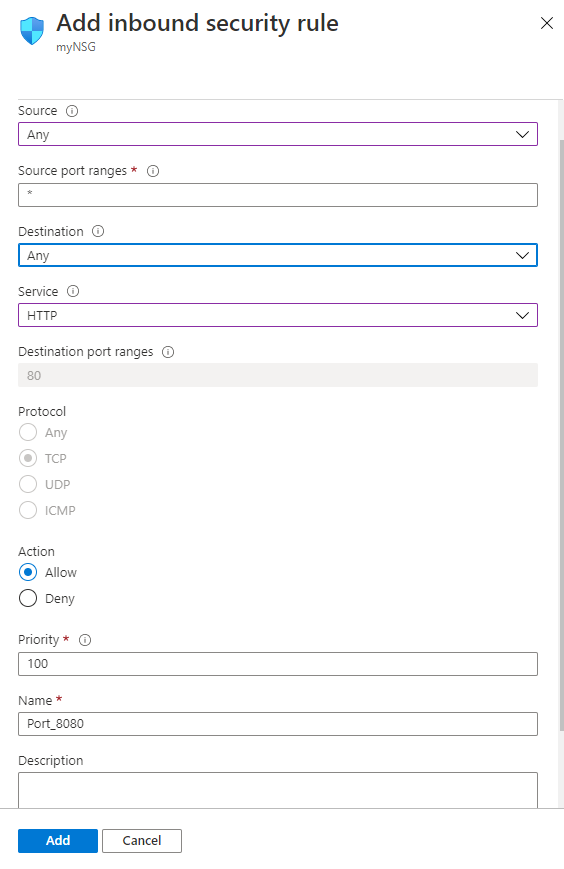
Step 4: Open port 5000 in security group by going to resource group –
- Select your network security group.
- Select Inbound security rules from the left menu, then select Add.
- You can limit the Source as needed or leave the default of Any.
- Limit the Source port range as 5000.
- You can limit the Destination as needed or leave the default of Any.
- Choose a common Service from the drop-down menu, TCP. You can also select Custom if you want to provide a specific port to use like Port_4000.
- Optionally, change the Priority or Name. The priority affects the order in which rules are applied: the lower the numerical value, the earlier the rule is applied.
- Select Add to create the rule.
Step 5: Open putty and connect with your machine. Add IP address of the running virtual machine.
Step 6: Login with user name and password that you provided during machine creation.
Step 7: Run the downloaded script.
$ sudo bash install-ubuntu_6.0_en.sh

You will be prompted to set the installation directory. By default, /var/www/ will be used if you enter Y.
After the installation completes, a random administrator username and password will be displayed in your console and the required aaPanel ports will be automatically configured on the firewall.
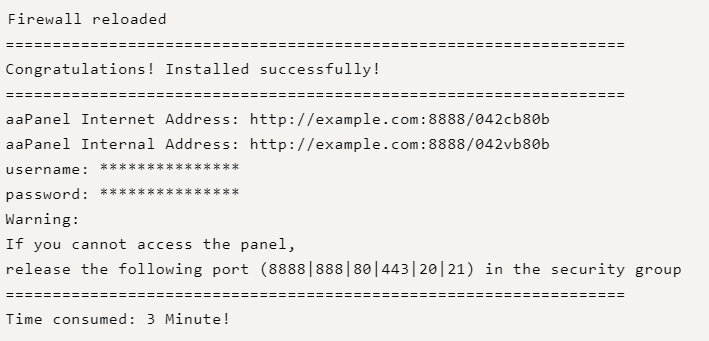
Confirm current firewall rules if port 8888, and other aaPanel ports are allowed:
$ sudo ufw status
aaPanel is now ready for configuration.
Step 2 – Configure aaPanel
Copy the random secure URL from your SSH console. Paste it in your web browser and log in to the control panel using random credentials generated by the installation script.
http://your_server_ip:8888/your-random-string
Step 3 – Install a LAMP Stack
You will be required to install a web stack on your server. Both the LEMP and LAMP Stack will be displayed in a pop-up window. Select your best choice. In this article, we’ll install the LAMP stack.
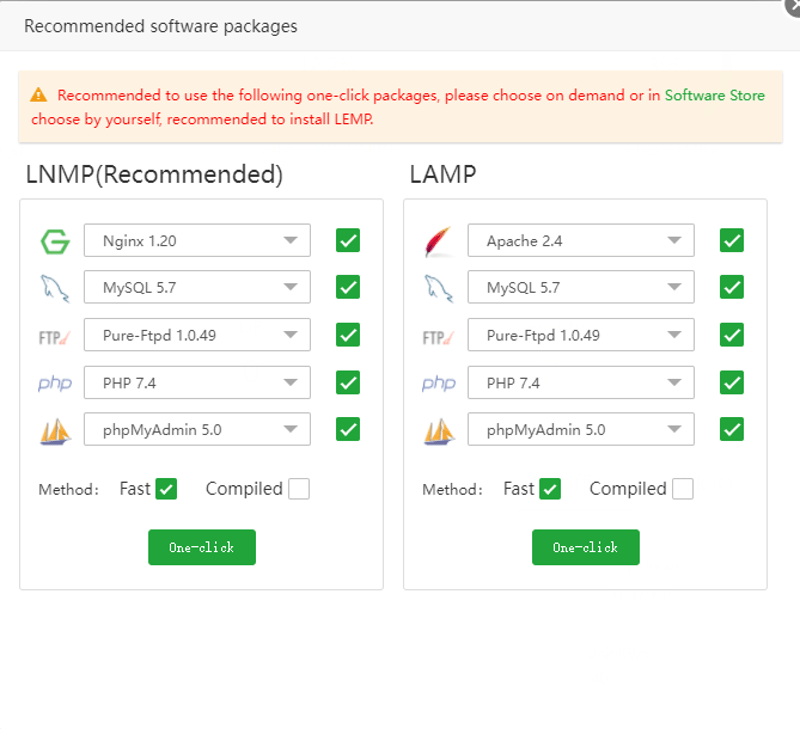
The web stack installation process will start. Depending on your server specifications, the installation will take about 5 minutes to complete.
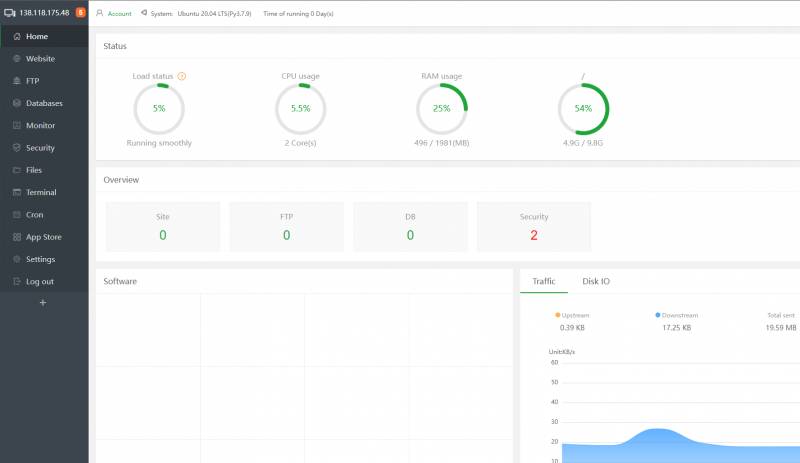
Next, the main aaPanel dashboard displays your current server resources usage, traffic, statistics, and control panel tools to configure the server.
Step 4 – Add a Domain Name
Let’s add a new domain name and create a simple website to host on the server.
Navigate to Website on the right pane, then choose between a PHP or Node JS Project and click Add Site. Enter your domain name, a description for the website, then select your database server and PHP version to use.
To secure the website with HTTPS, click Apply for SSL, then click Submit to create your new website.
Your website will be parked with a default system page. You can change it by uploading your website files to the domain’s web files directory /var/www/wwwroot/example.com/
Step 5 – Secure the Server
To secure the control panel, navigate to Settings and change the default port from 8888 to something random, then change Alias (Panel name) to your desired custom text.
Set a short timeout period of at least 360 seconds (6 minutes) to log out active users if the control panel is dormant with no user action.
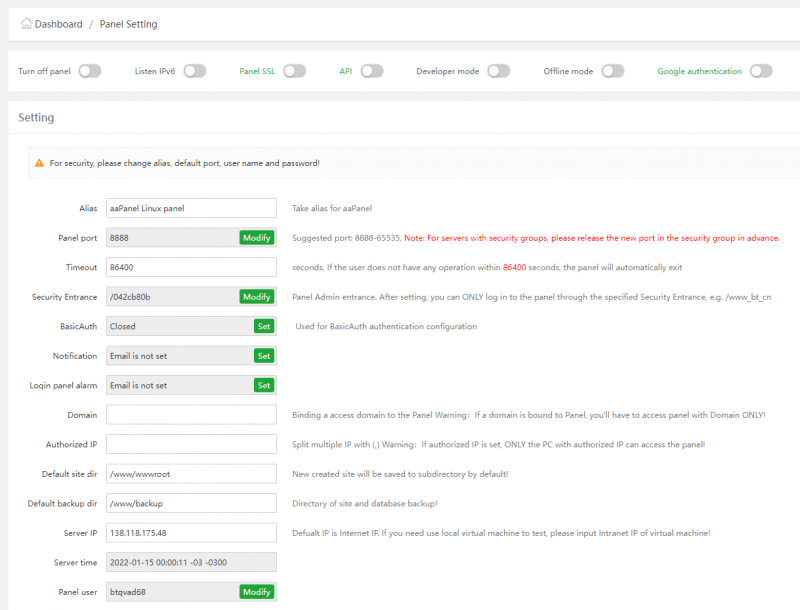
Modify Security Entrance to a custom string you can use to securely access the control panel. You can not access the web panel without the security key because Security Entrance is turned on by default.
Additionally, change the administrator Panel user account and Panel Password from the random defaults provided by the installation script to your custom values. To further tighten your server security, you can optionally specify a list of authorized IP addresses that can access the web panel under Authorized IP.
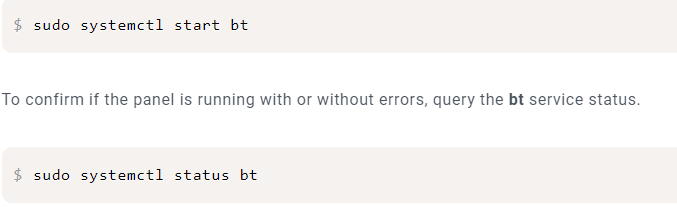
Step 6 – Configure the System Service
If the server reboots, the web panel will fails to load on port 8888. Start aaPanel using bt as the service identifier.
$ sudo systemctl start bt
$ sudo systemctl status bt
- (510) 298-5936
Submit Your Request
Until now, small developers did not have the capital to acquire massive compute resources and ensure they had the capacity they needed to handle unexpected spikes in load. Amazon EC2 enables any developer to leverage Amazon’s own benefits of massive scale with no up-front investment or performance compromises. Developers are now free to innovate knowing that no matter how successful their businesses become, it will be inexpensive and simple to ensure they have the compute capacity they need to meet their business requirements.
The “Elastic” nature of the service allows developers to instantly scale to meet spikes in traffic or demand. When computing requirements unexpectedly change (up or down), Amazon EC2 can instantly respond, meaning that developers have the ability to control how many resources are in use at any given point in time. In contrast, traditional hosting services generally provide a fixed number of resources for a fixed amount of time, meaning that users have a limited ability to easily respond when their usage is rapidly changing, unpredictable, or is known to experience large peaks at various intervals.
Traditional hosting services generally provide a pre-configured resource for a fixed amount of time and at a predetermined cost. Amazon EC2 differs fundamentally in the flexibility, control and significant cost savings it offers developers, allowing them to treat Amazon EC2 as their own personal data center with the benefit of Amazon.com’s robust infrastructure.
When computing requirements unexpectedly change (up or down), Amazon EC2 can instantly respond, meaning that developers have the ability to control how many resources are in use at any given point in time. In contrast, traditional hosting services generally provide a fixed number of resources for a fixed amount of time, meaning that users have a limited ability to easily respond when their usage is rapidly changing, unpredictable, or is known to experience large peaks at various intervals.
Secondly, many hosting services don’t provide full control over the compute resources being provided. Using Amazon EC2, developers can choose not only to initiate or shut down instances at any time, they can completely customize the configuration of their instances to suit their needs – and change it at any time. Most hosting services cater more towards groups of users with similar system requirements, and so offer limited ability to change these.
Finally, with Amazon EC2 developers enjoy the benefit of paying only for their actual resource consumption – and at very low rates. Most hosting services require users to pay a fixed, up-front fee irrespective of their actual computing power used, and so users risk overbuying resources to compensate for the inability to quickly scale up resources within a short time frame.
You have complete control over the visibility of your systems. The Amazon EC2 security systems allow you to place your running instances into arbitrary groups of your choice. Using the web services interface, you can then specify which groups may communicate with which other groups, and also which IP subnets on the Internet may talk to which groups. This allows you to control access to your instances in our highly dynamic environment. Of course, you should also secure your instance as you would any other server.
Highlights
- Comprehensive Server Management.
- Website Deployment Made Easy.
- Application Support.
- Resource Monitoring.
- Community Support.
- Scalability.
Application Installed
